Step 1
Introduction: What You Will Build
Welcome to this hands-on guide for building a sketch application that uses MetaMask and the Arkiv blockchain. In this tutorial, you'll create a web application where users can draw sketches, save them to the Arkiv network, and view their previously saved artwork.
The Goal
The objective is to demonstrate how to integrate MetaMask with Arkiv to build a decentralized application. You'll learn how to connect to a user's wallet, write data to the blockchain, and query that data back for display.
- MetaMask Integration. Connect to the user's wallet using viem and automatically switch to the Arkiv Kaolin testnet.
- Drawing Canvas. A p5.js-powered canvas where users can create simple sketches with their mouse or touch input.
- Blockchain Storage. Save drawings to Arkiv as entities with automatic expiration and custom attributes for querying.
- Gallery View. Display all sketches owned by the connected user with links to view them on the Arkiv explorer.
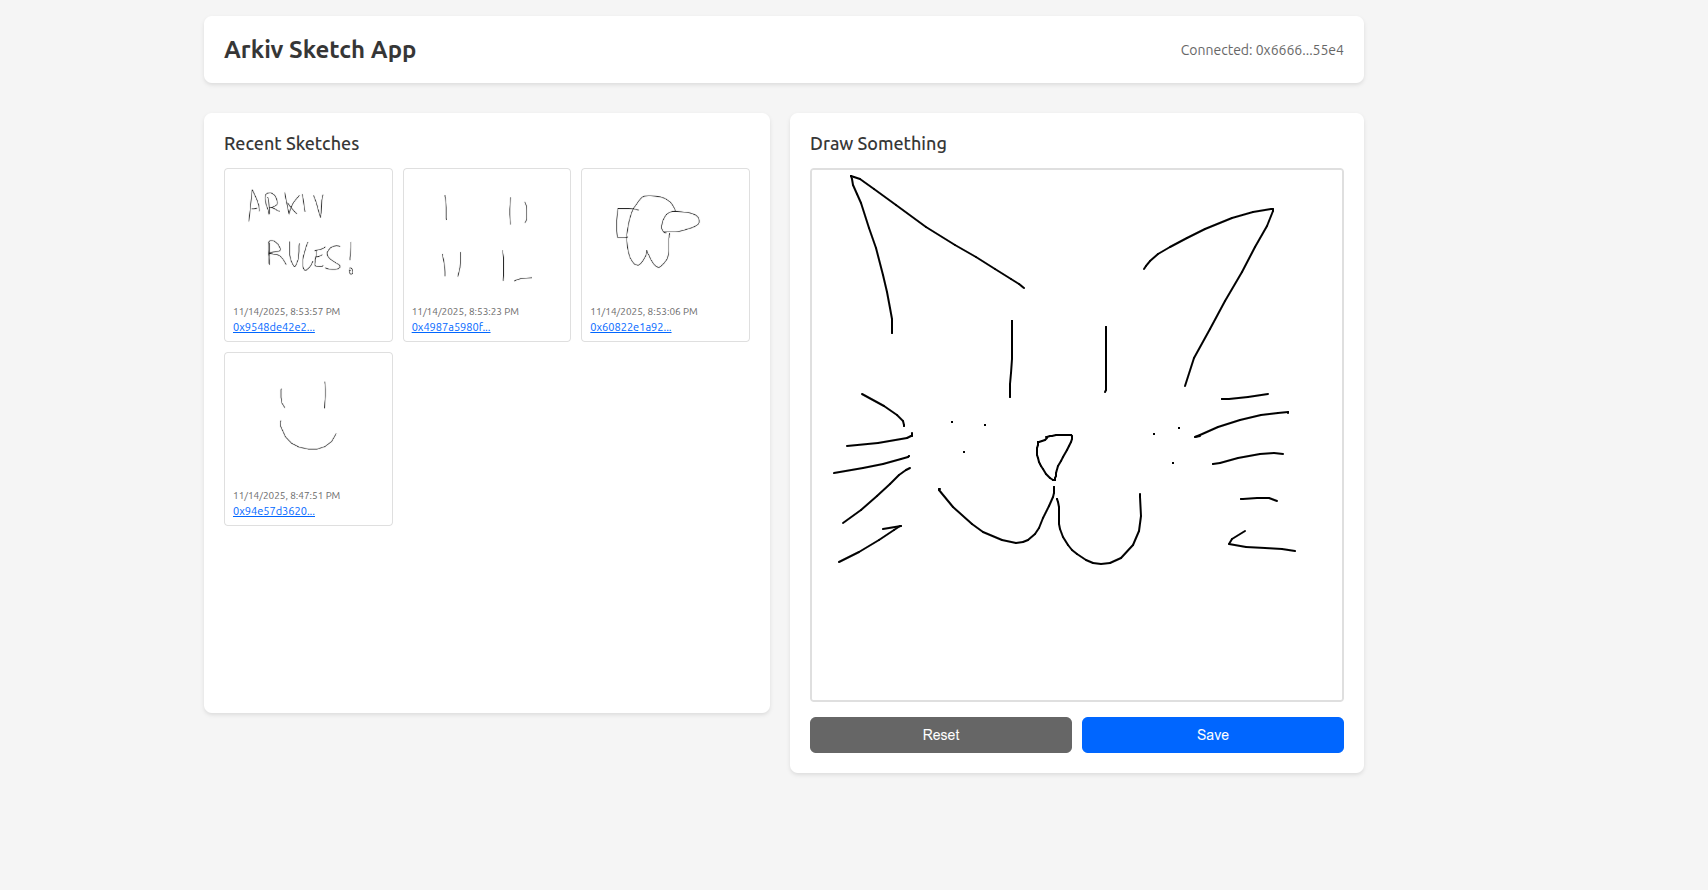
The Final Product
By the time you reach the end of the guide, your application will feature:
- A two-column layout with a gallery on the left and canvas on the right.
- One-click MetaMask connection with automatic network switching.
- Drawing capabilities using p5.js.
- Blockchain storage of sketches as PNG images.
- Real-time gallery updates after saving new sketches.
- Direct links to view entities on the Arkiv Kaolin explorer.
Preview the finished experience in the hosted demo: https://arkiv-network.github.io/learn-arkiv/_demos/metamask-tutorial/.
Prerequisites
Before starting, make sure you have:
- Node.js installed on your system
- MetaMask browser extension installed
- Basic knowledge of TypeScript and web development
- A code editor (VS Code recommended)
Step 2
Project Setup
This project uses Vite as the build tool for fast development and TypeScript for type safety. Let's set up the project structure and install all necessary dependencies.
1. Initialize the Vite Project
Create a new Vite project with the vanilla TypeScript template:
1npm create vite@latest arkiv-sketch-app -- --template vanilla-ts
2cd arkiv-sketch-app
3npm install
This creates a basic vanilla TypeScript project with Vite as the build tool. The template includes a simple HTML file and TypeScript setup.
2. Install Dependencies
Install the required packages for Arkiv and drawing functionality:
1npm install @arkiv-network/sdk p5 @types/p5What we're installing:
@arkiv-network/sdk- The Arkiv blockchain SDK (built on viem)p5- Drawing library for the canvas@types/p5- TypeScript type definitions for p5.js
3. Clean Up and Create Project Files
The Vite template includes some placeholder files we don't need. Remove them and create our project structure:
1# Remove Vite placeholder files
2rm -rf public src/counter.ts src/typescript.svg src/vite-env.d.ts
3
4# Create our project files
5touch src/wallet.ts src/sketch.ts
4. Configure Vite for WASM
The Arkiv SDK uses WebAssembly modules for data compression. Create a vite.config.ts file in the project root to configure Vite to handle these modules correctly:
1import { defineConfig } from "vite";
2
3export default defineConfig({
4  optimizeDeps: {
5    exclude: ["brotli-wasm", "brotli-wasm/pkg.bundler/brotli_wasm_bg.wasm"],
6  },
7});
Project Structure
Your project structure should look like this:
1arkiv-sketch-app/
2  src/
3    main.ts
4    wallet.ts
5    sketch.ts
6    style.css
7  index.html
8  vite.config.ts
9  package.json
10  node_modules/
In the next steps, you'll create the wallet integration module (wallet.ts) for MetaMask connection and the sketch module (sketch.ts) for reading and writing data to Arkiv.
Step 3
HTML Structure & Styling
Now let's build the user interface. The app has a two-column layout: a gallery on the left showing saved sketches, and a drawing canvas on the right where users can create new artwork.
1. Create the HTML Structure
Replace the contents of index.html with:
1<!DOCTYPE html>
2<html lang="en">
3  <head>
4    <meta charset="UTF-8" />
5    <link rel="icon" type="image/svg+xml" href="/vite.svg" />
6    <meta name="viewport" content="width=device-width, initial-scale=1.0" />
7    <title>Arkiv Sketch App</title>
8  </head>
9  <body>
10    <div id="app">
11      <header>
12        <h1>Arkiv Sketch App</h1>
13        <button id="connect-btn">Connect MetaMask</button>
14        <div id="account"></div>
15      </header>
16
17      <div class="container">
18        <div class="left-panel">
19          <h2>Recent Sketches</h2>
20          <div id="sketch-list">
21            <p>Connect your wallet to see sketches</p>
22          </div>
23        </div>
24
25        <div class="right-panel">
26          <h2>Draw Something</h2>
27          <div id="canvas-container"></div>
28          <div class="controls">
29            <button id="reset-btn">Reset</button>
30            <button id="save-btn">Save</button>
31          </div>
32        </div>
33      </div>
34    </div>
35    <script type="module" src="/src/main.ts"></script>
36  </body>
37</html>
2. Add CSS Styling
Replace the contents of src/style.css with:
1* {
2  margin: 0;
3  padding: 0;
4  box-sizing: border-box;
5}
6
7body {
8  font-family: -apple-system, BlinkMacSystemFont, "Segoe UI", Roboto, Oxygen,
9    Ubuntu, Cantarell, sans-serif;
10  background: #f5f5f5;
11  color: #333;
12}
13
14#app {
15  max-width: 1200px;
16  margin: 0 auto;
17  padding: 20px;
18}
19
20header {
21  display: flex;
22  justify-content: space-between;
23  align-items: center;
24  margin-bottom: 30px;
25  padding: 20px;
26  background: white;
27  border-radius: 8px;
28  box-shadow: 0 2px 4px rgba(0, 0, 0, 0.1);
29}
30
31h1 {
32  font-size: 24px;
33  font-weight: 600;
34}
35
36h2 {
37  font-size: 18px;
38  margin-bottom: 15px;
39  font-weight: 500;
40}
41
42button {
43  padding: 10px 20px;
44  border: none;
45  border-radius: 6px;
46  background: #0066ff;
47  color: white;
48  font-size: 14px;
49  font-weight: 500;
50  cursor: pointer;
51  transition: background 0.2s;
52}
53
54button:hover:not(:disabled) {
55  background: #0052cc;
56}
57
58button:disabled {
59  opacity: 0.6;
60  cursor: not-allowed;
61}
62
63#account {
64  font-size: 14px;
65  color: #666;
66}
67
68.container {
69  display: grid;
70  grid-template-columns: 1fr 1fr;
71  gap: 20px;
72}
73
74.left-panel,
75.right-panel {
76  background: white;
77  padding: 20px;
78  border-radius: 8px;
79  box-shadow: 0 2px 4px rgba(0, 0, 0, 0.1);
80}
81
82.left-panel {
83  max-height: 600px;
84  overflow-y: auto;
85}
86
87#sketch-list {
88  display: grid;
89  grid-template-columns: repeat(3, 1fr);
90  gap: 10px;
91}
92
93.sketch-item {
94  border: 1px solid #e0e0e0;
95  border-radius: 4px;
96  padding: 8px;
97  transition: transform 0.2s;
98}
99
100.sketch-item:hover {
101  transform: translateX(4px);
102}
103
104.sketch-item img {
105  width: 120px;
106  height: 120px;
107  object-fit: cover;
108  border-radius: 4px;
109  margin-bottom: 6px;
110}
111
112.sketch-info {
113  display: flex;
114  justify-content: space-between;
115  font-size: 12px;
116  color: #666;
117  margin-bottom: 4px;
118}
119
120.entity-link {
121  display: block;
122  font-size: 11px;
123  color: #0066ff;
124  text-decoration: underline;
125  word-break: break-all;
126}
127
128.entity-link:hover {
129  color: #0052cc;
130}
131
132#canvas-container {
133  margin-bottom: 15px;
134  border: 2px solid #e0e0e0;
135  border-radius: 4px;
136  overflow: hidden;
137}
138
139#canvas-container canvas {
140  display: block;
141  cursor: crosshair;
142}
143
144.controls {
145  display: flex;
146  gap: 10px;
147}
148
149.controls button {
150  flex: 1;
151}
152
153#reset-btn {
154  background: #666;
155}
156
157#reset-btn:hover:not(:disabled) {
158  background: #555;
159}With the HTML and CSS in place, you now have the visual foundation for the app. In the next step, you'll add MetaMask integration to connect users' wallets.
Step 4
MetaMask Integration
Now let's implement the wallet connection logic. This module handles connecting to MetaMask, automatically switching to the Arkiv Kaolin testnet, and creating the blockchain clients for reading and writing data. We'll build this in two parts.
1. Imports and MetaMask Connection
Open src/wallet.ts and let's add a function that connects to MetaMask and switches to the Kaolin chain if needed:
1import {
2  createPublicClient,
3  createWalletClient,
4  custom,
5  http,
6} from "@arkiv-network/sdk";
7import { kaolin } from "@arkiv-network/sdk/chains";
8import "viem/window";
9
10async function switchToKaolinChain() {
11  if (!window.ethereum) {
12    throw new Error("MetaMask not installed");
13  }
14
15  const chainIdHex = `0x${kaolin.id.toString(16)}`;
16
17  try {
18    // Try to switch to the chain
19    await window.ethereum.request({
20      method: "wallet_switchEthereumChain",
21      params: [{ chainId: chainIdHex }],
22    });
23  } catch (error: unknown) {
24    // Chain doesn't exist, add it
25    if (
26      error &&
27      typeof error === "object" &&
28      "code" in error &&
29      error.code === 4902
30    ) {
31      await window.ethereum.request({
32        method: "wallet_addEthereumChain",
33        params: [
34          {
35            chainId: chainIdHex,
36            chainName: kaolin.name,
37            nativeCurrency: kaolin.nativeCurrency,
38            rpcUrls: kaolin.rpcUrls.default.http,
39            blockExplorerUrls: [kaolin.blockExplorers.default.url],
40          },
41        ],
42      });
43    } else {
44      throw error;
45    }
46  }
47}
48
49export async function connectWallet() {
50  if (!window.ethereum) {
51    throw new Error("MetaMask not installed");
52  }
53
54  // First switch to the correct chain
55  await switchToKaolinChain();
56
57  // Then request accounts
58  const accounts = await window.ethereum.request({
59    method: "eth_requestAccounts",
60  });
61
62  return accounts[0];
63}
Import Statement: import "viem/window"
This special import provides TypeScript type definitions for window.ethereum, which is the MetaMask API injected into the browser. Without this, TypeScript would show errors when accessing window.ethereum.
Function: switchToKaolinChain()
This function checks if MetaMask is installed, then attempts to switch to the Kaolin chain. If the chain is not already added to MetaMask (error code 4902), it adds it using the network details from the kaolin chain object.
2. Creating Arkiv Clients
Add the function to create public and wallet clients for interacting with the Arkiv blockchain:
1export function createArkivClients(account?: `0x${string}`) {
2  if (!window.ethereum) {
3    throw new Error("MetaMask not installed");
4  }
5
6  const publicClient = createPublicClient({
7    chain: kaolin,
8    transport: http(), // use the default RPC defined in the chain object
9  });
10
11  const walletClient = createWalletClient({
12    chain: kaolin,
13    transport: custom(window.ethereum), // use MetaMask to sign transactions
14    account,
15  });
16
17  return { publicClient, walletClient };
18}
Public Client vs Wallet Client
This function creates two types of clients for interacting with Arkiv:
- Public Client - For reading data from the blockchain. Uses HTTP transport with the default RPC endpoint. No account required.
- Wallet Client - For writing data to the blockchain. Uses MetaMask to interact with the blockchain. Requires an account for signing transactions.
Step 5
Reading & Writing Data to Arkiv
Now let's implement the core data operations: saving new sketches to the blockchain and loading existing sketches from Arkiv. Create a new file src/sketch.ts for these functions.
1. Define the Sketch Interface and Imports
1import { desc, eq } from "@arkiv-network/sdk/query";
2import { createArkivClients } from "./wallet";
3import { jsonToPayload, ExpirationTime } from "@arkiv-network/sdk/utils";
4
5export interface Sketch {
6  id: string;
7  timestamp: number;
8  imageData: string;
9}
The Sketch interface defines the structure for sketch data in our application. Each sketch has a unique ID (the entity key), a timestamp, and the image data as a base64-encoded PNG.
2. Writing Data: saveSketch()
Let's start by creating the function to save sketches to Arkiv. This function creates a new entity on the blockchain:
1export async function saveSketch(
2  imageData: string,
3  userAddress: string,
4): Promise<string> {
5  const { walletClient } = createArkivClients(userAddress as `0x${string}`);
6
7  const { entityKey } = await walletClient.createEntity({
8    payload: jsonToPayload({
9      imageData,
10      timestamp: Date.now(),
11    }),
12    contentType: "application/json",
13    attributes: [
14      { key: "type", value: "sketch" }, // custom attribute to identify which entities are sketches
15      { key: "timestamp", value: Date.now() }, // we will sort by this timestamp later
16    ],
17    expiresIn: ExpirationTime.fromDays(365),
18  });
19
20  return entityKey;
21}
Entity Creation Breakdown
- payload - The data to store. We use
jsonToPayload()to convert our JSON object to binary format (Uint8Array) - contentType - MIME type of the payload (
"application/json") - attributes - Key-value pairs for querying and sorting. We set two attributes:
type: "sketch"- Allows us to filter sketch entities from other typestimestamp: Date.now()- Enables sorting by creation time in queries
- expiresIn - Time-to-live for the entity. Using
ExpirationTime.fromDays(365)means the sketch will be automatically deleted after 1 year
3. Reading Data: loadSketches()
Now add the function to query Arkiv and fetch all sketches owned by the user:
1export async function loadSketches(userAddress: string): Promise<Sketch[]> {
2  try {
3    const { publicClient } = createArkivClients();
4
5    const result = await publicClient
6      .buildQuery()
7      .where(eq("type", "sketch")) // our custom attribute we set when saving
8      .ownedBy(userAddress as `0x${string}`) // only sketches owned by the user
9      .orderBy(desc("timestamp", "number")) // order by timestamp - another custom attribute we set
10      .withPayload(true)
11      .limit(9)
12      .fetch();
13
14    const sketches = result.entities
15      .map((entity) => {
16        try {
17          const payload = entity.toJson();
18          if (payload?.imageData) {
19            return {
20              id: entity.key,
21              timestamp: payload.timestamp || 0,
22              imageData: payload.imageData,
23            } as Sketch;
24          }
25          return null;
26        } catch {
27          return null;
28        }
29      })
30      .filter((s): s is Sketch => s !== null)
31      .sort((a, b) => b.timestamp - a.timestamp);
32
33    return sketches;
34  } catch (error) {
35    console.error("Failed to load sketches:", error);
36    return [];
37  }
38}
Query Builder Breakdown
.buildQuery()- Creates a new query builder for the Arkiv blockchain.where(eq("type", "sketch"))- Filters entities with the attributetype = "sketch".ownedBy(userAddress)- Only returns entities that were created by the user.orderBy(desc("timestamp", "number"))- Sorts results by thetimestampattribute in descending order (newest first).withPayload(true)- Includes the entity payload (binary data) in the response.limit(9)- Returns a maximum of 9 results (for a 3x3 grid).fetch()- Executes the query and returns the results
The SDK provides a convenient entity.toJson() method that automatically decodes the binary payload and parses it as JSON. This simplifies the data extraction:
Step 6
Main Application Logic
Now let's bring everything together in the main application file. This module handles the UI interactions, p5.js canvas setup, and coordinates between the wallet and sketch modules. We'll build this step by step.
1. Imports and Initial Setup
First, import the necessary modules and set up global variables for managing application state:
1import "./style.css";
2import p5 from "p5";
3import { connectWallet } from "./wallet";
4import { loadSketches, saveSketch, type Sketch } from "./sketch";
5
6let userAddress: string | null = null;
7let sketches: Sketch[] = [];
8let p5Instance: p5 | null = null;
9
10// DOM elements
11const connectBtn = document.getElementById("connect-btn") as HTMLButtonElement;
12const accountDiv = document.getElementById("account") as HTMLDivElement;
13const sketchList = document.getElementById("sketch-list") as HTMLDivElement;
14const saveBtn = document.getElementById("save-btn") as HTMLButtonElement;
15const resetBtn = document.getElementById("reset-btn") as HTMLButtonElement;
16const canvasContainer = document.getElementById(
17  "canvas-container"
18) as HTMLDivElement;
We select all DOM elements upfront and type them properly for TypeScript safety. The global variables track the user's address, loaded sketches, and the p5.js instance.
2. Wallet Connection Handler
Add the event listener for the connect button that handles the MetaMask connection flow:
1// Connect wallet
2connectBtn.addEventListener("click", async () => {
3  try {
4    connectBtn.disabled = true;
5    connectBtn.textContent = "Connecting...";
6    userAddress = await connectWallet();
7    accountDiv.textContent = `Connected: ${userAddress.slice(0, 6)}...${userAddress.slice(-4)}`;
8    connectBtn.style.display = "none";
9    await refreshSketches();
10  } catch (error) {
11    console.error("Failed to connect:", error);
12    alert(`Failed to connect wallet: ${(error as Error).message}`);
13    connectBtn.disabled = false;
14    connectBtn.textContent = "Connect MetaMask";
15  }
16});
Connection flow:
- Button is disabled and shows "Connecting..." to prevent double-clicks
connectWallet()prompts MetaMask to switch networks and request accounts- User address is stored and displayed in shortened format
- Connect button is hidden (user is now connected)
refreshSketches()is called to load existing sketches
3. Sketch Loading and Rendering
Add functions to load sketches from Arkiv and render them in the gallery:
1// Refresh sketches from Arkiv
2async function refreshSketches() {
3  if (!userAddress) return;
4
5  try {
6    sketchList.innerHTML = "<p>Loading sketches...</p>";
7    sketches = await loadSketches(userAddress);
8    renderSketchList();
9  } catch (error) {
10    console.error("Failed to load sketches:", error);
11    sketchList.innerHTML = "<p>Failed to load sketches</p>";
12  }
13}
14
15// Render sketch list
16function renderSketchList() {
17  if (sketches.length === 0) {
18    sketchList.innerHTML = "<p>No sketches yet. Draw something!</p>";
19    return;
20  }
21
22  sketchList.innerHTML = sketches
23    .map((sketch) => {
24      const date = new Date(sketch.timestamp).toLocaleString();
25      return `
26        <div class="sketch-item">
27          <img src="${sketch.imageData}" alt="Sketch" />
28          <div class="sketch-info">
29            <small>${date}</small>
30          </div>
31          <a href="https://explorer.kaolin.hoodi.arkiv.network/entity/${sketch.id}" target="_blank" class="entity-link">
32            ${sketch.id.slice(0, 12)}...
33          </a>
34        </div>
35      `;
36    })
37    .join("");
38}
How it works:
refreshSketches()- Shows a loading message, calls the Arkiv query, and updates the UIrenderSketchList()- Generates HTML for each sketch with thumbnail, timestamp, and explorer link
Each sketch links to the Arkiv Kaolin explorer where you can view the full entity data
4. p5.js Canvas Setup
Initialize the drawing canvas using p5.js. This creates an interactive canvas where users can draw:
1// Setup p5.js canvas
2const sketch = (p: p5) => {
3  p.setup = () => {
4    const containerWidth = canvasContainer.offsetWidth;
5    p.createCanvas(containerWidth, containerWidth);
6    p.background(255);
7  };
8
9  p.draw = () => {
10    if (p.mouseIsPressed) {
11      p.stroke(0);
12      p.strokeWeight(2);
13      p.line(p.mouseX, p.mouseY, p.pmouseX, p.pmouseY);
14    }
15  };
16};
17
18p5Instance = new p5(sketch, canvasContainer);
5. Button Event Handlers
Finally, add handlers for the Reset and Save buttons:
1// Reset canvas
2resetBtn.addEventListener("click", () => {
3  if (p5Instance) {
4    p5Instance.background(255);
5  }
6});
7
8// Save sketch
9saveBtn.addEventListener("click", async () => {
10  if (!userAddress || !p5Instance) return;
11
12  try {
13    saveBtn.disabled = true;
14    saveBtn.textContent = "Saving...";
15
16    // Get canvas element and convert to image data
17    const canvas = document.querySelector(
18      "#canvas-container canvas"
19    ) as HTMLCanvasElement;
20    const imageData = canvas.toDataURL("image/png");
21
22    await saveSketch(imageData, userAddress);
23
24    // Reset canvas and refresh list
25    p5Instance.background(255);
26    await refreshSketches();
27
28    saveBtn.disabled = false;
29    saveBtn.textContent = "Save";
30  } catch (error) {
31    console.error("Failed to save sketch:", error);
32    alert(`Failed to save sketch: ${(error as Error).message}`);
33    saveBtn.disabled = false;
34    saveBtn.textContent = "Save";
35  }
36});
Step 7
Running the App & Next Steps
Your sketch app is now complete! Let's run it and explore what you've built.
1. Start the Development Server
From your project directory, run:
1npm run devVite will start a local development server, usually at http://localhost:5173. Open this URL in your browser.
2. Connect Your Wallet
- Click the "Connect MetaMask" button
- MetaMask will prompt you to add/switch to the Arkiv Kaolin testnet - click "Approve"
- MetaMask will then request access to your account - click "Connect"
- Your address will appear in shortened format (e.g.,
0x1234...5678) - The app will automatically load any existing sketches you've saved
3. Create and Save a Sketch
- Draw something on the canvas by clicking and dragging
- Click "Save" when you're happy with your drawing
- MetaMask will pop up requesting transaction approval
- Review the gas fee and click "Confirm"
- Wait a few seconds for the transaction to complete
- Your sketch will appear in the left gallery with a timestamp
4. View on the Arkiv Explorer
Each sketch in the gallery has a link to view it on the Arkiv Kaolin explorer. Click the link to see:
- The full entity data including payload
- Transaction details and block information
- Attribute metadata (
type: "sketch") - Expiration time (365 days from creation)
- Owner address
What You've Built
Congratulations! You've successfully created a decentralized application that:
- Connects to MetaMask using viem with automatic network switching
- Writes to the blockchain by creating entities with image data and metadata
- Reads from the blockchain by querying entities with filters and loading payloads
- Manages user data with owner-based filtering so users only see their own sketches
- Handles expiration with automatic cleanup after 365 days
Next Steps: Enhance Your App
Here are some ideas to expand on what you've learned:
- Add color picker - Let users choose different drawing colors
- Add brush size control - Slider for stroke weight
- Pagination - Load more than 10 sketches with next/previous buttons
- Delete sketches - Add ability to remove your own entities
- Date range filtering - Query sketches from specific time periods
The full source code for this guide is available on GitHub: https://github.com/Arkiv-Network/learn-arkiv/tree/main/tutorial-source-code/metamask-tutorial.